How To Create Banner Stand Artwork
<< Back to Guides and TutorialsThis guide is based on using Adobe Illustrator CS4. If you have an earlier version it may look slightly different but the functionality should remain the same, we will also use our budget roller banner stand as an example product for our artwork.
1) Setting up a new document
Firstly open Adobe Illustrator and click file, new (ctrl + n or cmd + n), and enter the information as the screenshot below: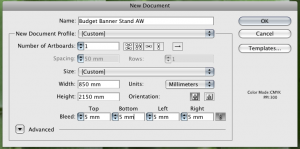
Width and Height
As you can see from the above screenshot we need to set our width to its final trimmed size of 850mm and the height to 2150mm as per the Budget Banner Artwork Specification PDF.
Bleed
Now we need to set the bleed (What is printing bleed?), this is set by modifying the 4 boxes found under height that read; Top, Bottom, Left and Right. Our artwork specification requires 5mm all round (5mm on each edge) so set them accordingly. Our banner stand also has 150mm of the overall height hidden in base of the stand at the bottom but do not add this into the bleed at this stage.
Now click ok to create the new document.
2) Working with the bleed
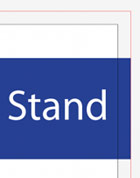
As per the screenshot you will notice a black border showing the document outline, further to this there will be a red line. This red line is a visual indicator of the 5mm bleed we added to each edge.
It is essential that any images or blocks of colour that run to the edge of the banner (such as the blue box in our example) are extended into the bleed area or you may see a white edge when it has been trimmed.
3) Allowing for the base
Generally, roller banner stands need an average of 150mm of material to populate the roller mechanism inside the base. Too much bleed and your graphic will be floppy, too little and you banner stand will have too much tension. So to avoid disappointment (especially on a tight deadline) you should always consult your banner stands artwork specification prior to preparing the artwork for print. (a download-able artwork specification pdf guide is available for each product that requires a print, this can be found on the product page).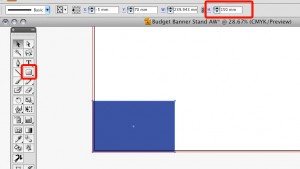
As per the screenshot above you should create a new box (any colour) then set it to 150mm high, then drag this to the very bottom left corner (into the bleed). You can then use the selection tool and drag this box out so it covers the entire bottom of the artwork from left bleed area to the right area, see above..
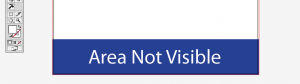
You have now created yourself a roller guide, you should regard this area as not being visible when the banner stand has been erected. This means you must also extend any images or blocks of colour that run to the edge of the graphic into this area.
4) Output
 Most printing companies such as ourselves require the following output file settings but you should always check with your printing supplier. We accept the following file formats; PDF, EPS, TIFF, JPG and PSD (Photoshop).
 In this example we will export our artwork as an Adobe PDF file.
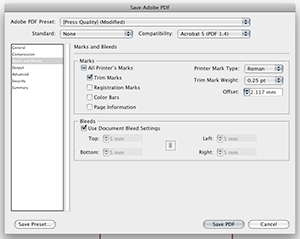
First click file, then save as. Change the format to Adobe PDF(pdf), change your documents name if required then click save. This will bring up the pdf settings menu to which you need to select [Press Quality] from the Adobe PDF Preset menu. The only modification you have to make on the preset is to add trim (crop) marks and bleed settings to the pdf, this is done by clicking "marks and bleeds" from the left menu and selecting the following check boxes; "Trim Marks" and "use document bleed settings".
Then click save PDF.